Mastering Manual Mode: A Beginner's Guide to DSLR Settings
Unlocking the full potential of your DSLR camera involves venturing into the realm of manual mode. While it might initially seem intimidating, mastering manual mode empowers you to have unparalleled control over your photographs. In this beginner's guide, we'll demystify DSLR settings, allowing you to confidently navigate through aperture, shutter speed, and ISO to capture stunning images.
Mastering Manual Mode: A Beginner's Guide to DSLR Settings - picviw.com
Understanding Aperture: The Gateway to Creativity
Aperture, represented by the f-stop value (e.g., f/1.8, f/5.6), determines the size of the lens opening. A lower f-stop (e.g., f/2.8) lets in more light and produces a shallower depth of field, ideal for portraits, isolating subjects, and creating that beautiful background blur known as bokeh. On the other hand, a higher f-stop (e.g., f/11) increases depth of field, keeping more elements in focus, perfect for landscapes.
Practical Tip: Experiment with different aperture settings to understand how they impact the look and feel of your photos.
Mastering Shutter Speed: Capturing Motion or Freezing Time
Shutter speed controls the duration of time your camera's shutter is open. A fast shutter speed (e.g., 1/1000s) freezes fast-moving subjects, while a slow shutter speed (e.g., 1/30s) introduces motion blur. Adjusting shutter speed allows you to capture dynamic action shots or create dreamy long-exposure effects.
Practical Tip: Match your shutter speed to the speed of your subject; for fast action, use a faster shutter speed.
Navigating ISO: Balancing Sensitivity and Grain
ISO measures your camera sensor's sensitivity to light. A lower ISO (e.g., ISO 100) is suitable for well-lit conditions, reducing the chance of noise or grain in your photos. In low-light situations, increase the ISO (e.g., ISO 800 or higher) to maintain proper exposure, but be mindful of potential graininess.
Practical Tip: Use the lowest ISO possible to maintain image quality, especially in well-lit environments.
Achieving Balance: The Exposure Triangle
Mastering manual mode involves finding the perfect balance between aperture, shutter speed, and ISO. This delicate interplay, often referred to as the exposure triangle, is the key to creating well-exposed and visually compelling photographs.
Practical Tip: Practice shooting in different lighting conditions to refine your understanding of the exposure triangle.
Getting Hands-On: Your Camera's Manual Controls
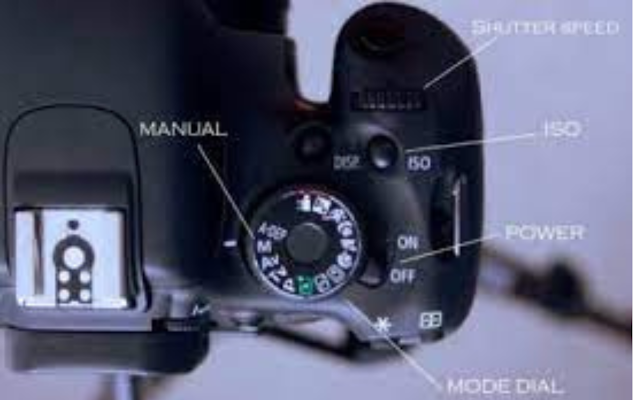
Locate the manual mode or "M" on your camera's mode dial to take control of your settings. Familiarize yourself with adjusting aperture, shutter speed, and ISO using the camera's buttons or dials. Don't hesitate to consult your camera's manual for specific instructions tailored to your model.
Practical Tip: Practice in a controlled environment before tackling challenging shooting conditions.
Conclusion: Your Journey into Creative Photography
Mastering manual mode is a journey that transforms your photography from automated snapshots to personalized works of art. As you become comfortable with these fundamental DSLR settings, you'll unleash your creativity and capture moments in ways that auto mode could never achieve. Embrace the learning process, experiment with settings, and enjoy the satisfaction of creating images that truly reflect your vision.
Remember, every great photographer started as a beginner. So, venture into manual mode with curiosity, and let your camera become an extension of your creative expression. Happy shooting!


